
Making a web API request and parsing the JSON
In part 1 we went over some basics of Swift, and set up a simple example project that creates a Table View and a puts some text inside of them.
For this section, we’re going to do something a little more ambitious. We’re going to hit the iTunes Search API for the iTunes Store, download the JSON results, parse them in to Dictionaries and then populate our Table View with this information. Then, we will add some user interaction by adding a click event to the tableview, so that when an item is clicked the iTunes store item will be opened.
If this sounds like a lot of work, don’t sweat it. This is pretty basic functionality for iOS apps and it’s one of the most common things any developer has to do. Let’s get going…
Connecting the UI
The first thing we need to do is get a reference to our tableView, so it can be used from code. Go ahead and add this line to your ViewController.swift file, just under the class definition, but outside of any functions.
@IBOutlet var appsTableView : UITableView?
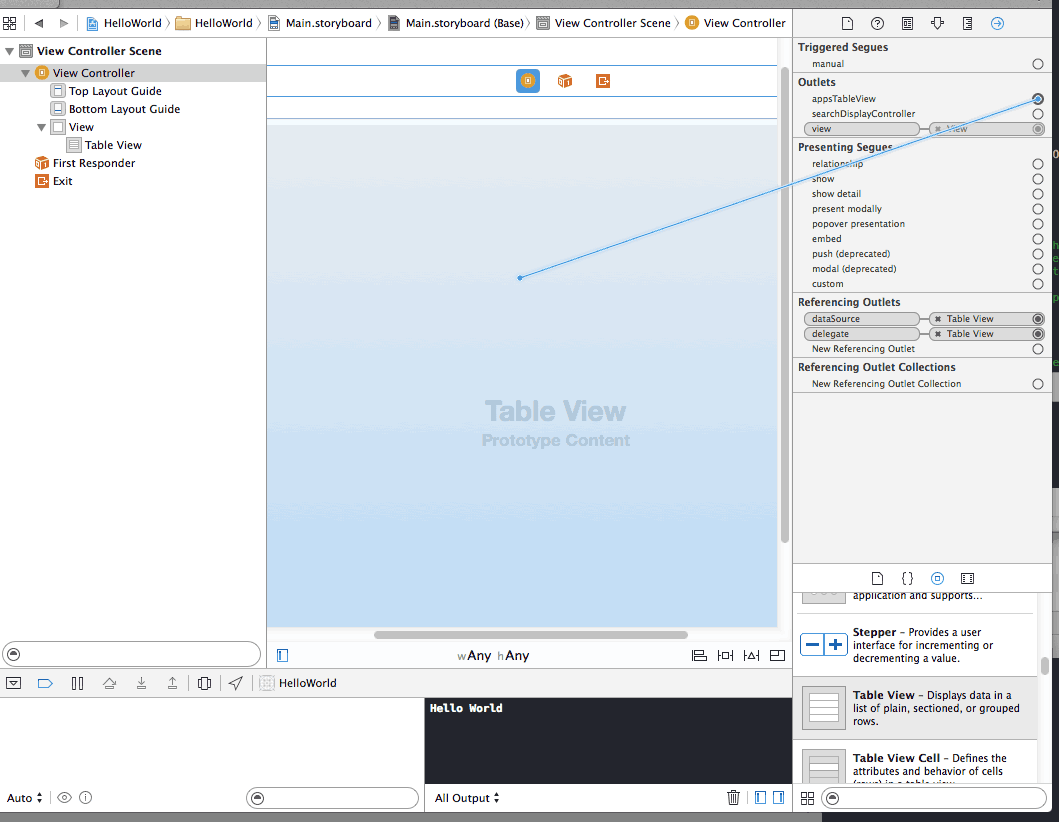
This bit of code allows up to connect our Table View in our Storyboard to this variable, “appsTableView”. Save this file and open up your storyboard. Now select the View Controller object (the one with a yellow icon) and in the right-hand side pane click the last tab, the Connections Inspector. Here you should now see an outlet for “appsTableView”. Click and drag from the dot next to this outlet on to the Table View in our scene.
Let’s also add a variable to hold the table data itself. Just under the class definition for ViewController add:
var tableData = []
Making the API Request
Now that we have the UI connected, we’re ready to make an API call. Create a new function called searchItunesFor(searchTerm: String). We’ll use this to make our requests happen for arbitrary search terms.
To keep this tutorial short, I’m going to just post my final code and let the comments do some of the explaining. I’m always open to questions and further discussion in the comments though, so feel free to chime in!
func searchItunesFor(searchTerm: String) {

    // The iTunes API wants multiple terms separated by + symbols, so replace spaces with + signs
    let itunesSearchTerm = searchTerm.stringByReplacingOccurrencesOfString(" ", withString: "+", options: NSStringCompareOptions.CaseInsensitiveSearch, range: nil)

    // Now escape anything else that isn't URL-friendly
    if let escapedSearchTerm = itunesSearchTerm.stringByAddingPercentEscapesUsingEncoding(NSUTF8StringEncoding) {
        let urlPath = "http://itunes.apple.com/search?term=\(escapedSearchTerm)&media=software"
        let url = NSURL(string: urlPath)
        let session = NSURLSession.sharedSession()
        let task = session.dataTaskWithURL(url!, completionHandler: {data, response, error -> Void in
            println("Task completed")
            if(error != nil) {
                // If there is an error in the web request, print it to the console
                println(error.localizedDescription)
            }
            var err: NSError?

            var jsonResult = NSJSONSerialization.JSONObjectWithData(data, options: NSJSONReadingOptions.MutableContainers, error: &err) as NSDictionary
            if(err != nil) {
                // If there is an error parsing JSON, print it to the console
                println("JSON Error \(err!.localizedDescription)")
            }
            let results: NSArray = jsonResult["results"] as NSArray
            dispatch_async(dispatch_get_main_queue(), {
                self.tableData = results
                self.appsTableView!.reloadData()
            })
        })

        task.resume()
    }
}
Let’s go line-by-line.
First, we need to do some fixing of the search terms we pass in, the Search API wants terms in the form of “First+Second+Third+Words” rather than “First%20Second%20…” etc. So instead of URL-encoding, we use an NSString method called stringByReplacingOccurencesOfString. This returns a modified versions of the searchTerm variable with all our spaces replaced with + symbols.
Next, we actually escape the search term in case of an other symbols that won’t fit in a URL.
The next 2 lines define an NSURL object that can be used as a Request URL for iOS’s networking API.
These two lines are critical:
let session = NSURLSession.sharedSession()
let task = session.dataTaskWithURL(url, completionHandler: {data, response, error -> Void in
The first grabs the default NSURLSession object. This is used or all our networking calls. The second line then creates the connection task which is going to be used to actually send the request. dataTaskWithURL has a closure as it’s last parameter, which gets run upon completion of the request. Here we check for errors in the response, then parse the JSON, and call the delegate method didReceiveAPIResults.
Finally, task.resume() actually begins the request.
Because this task happens in the background, we need to jump in to the foreground before we update the UI. So we need to use dispatch_async to move back in to the main thread, and reload the table view.
Making the API call
Now we’ve got a method that starts an iTunes search response when we call it. So let’s insert the following at the end of viewDidLoad…
searchItunesFor("JQ Software")
This will find any software products on the iTunes store containing that phrase, which in this case will include a couple of games I made years ago, and a few more recent things.
Receiving the response
Finally our request code is done and all data has been received, didReceiveAPIResults is called and we’re ready to use the data in our app. Hooray!
The closure method here uses the NSJSONSerialization class to convert our raw data in to useful Dictionary objects by deserializing the results from iTunes.
We can now set our self.tableData object to be the resulting data, and tell the appsTableView to reload it’s content. This will cause the Table View object to run it’s own delegate methods. Defining this is the final step in this part of the tutorial.
Updating the Table View UI
You may remember from last time we implemented two function for our Table View. A count function, which determines the number of rows; and a cell function, which actually creates the cell and modifies it for each row.
We’re going to update these now to use the data we pulled down from the web.
Swap out your methods with these two functions:
func tableView(tableView: UITableView, numberOfRowsInSection section: Int) -> Int {
    return tableData.count
}

func tableView(tableView: UITableView, cellForRowAtIndexPath indexPath: NSIndexPath) -> UITableViewCell {
    let cell: UITableViewCell = UITableViewCell(style: UITableViewCellStyle.Subtitle, reuseIdentifier: "MyTestCell")

    let rowData: NSDictionary = self.tableData[indexPath.row] as NSDictionary

    cell.textLabel.text = rowData["trackName"] as? String

    // Grab the artworkUrl60 key to get an image URL for the app's thumbnail
    let urlString: NSString = rowData["artworkUrl60"] as NSString
    let imgURL: NSURL? = NSURL(string: urlString)

    // Download an NSData representation of the image at the URL
     let imgData = NSData(contentsOfURL: imgURL!)
     cell.imageView.image = UIImage(data: imgData!)

    // Get the formatted price string for display in the subtitle
    let formattedPrice: NSString = rowData["formattedPrice"] as NSString

    cell.detailTextLabel?.text = formattedPrice

    return cell
}
The numberOfRowsInSection is now simply returning the number of resultant objects from the tableData member, which is set in our prior connectionDidFinishLoading method.
The cellForRowAtIndexPath is also not changed dramatically in this case. Rather than simply returning the row number, we use the row number to grab three pieces of information: the track name, the artwork url, and the price.
Using these keys we construct the title, subtitle, and an image to go along with the cell.
Try running our app, and you’ll see we for the first time have created something that actually looks like an app all in Swift!